- Published on
How to create a collection on Shopify
- Authors

- Name
- Entaice Braintrust
How to create and use collections in Shopify
Creating collections in Shopify is straightforward (and easy to do).
Learning why they're important and how to use them to their fullest potential is a whole other game.
If you've landed on this page - you likely started by asking google "how to create a collection on Shopify" - or something similar. And if that's what you're looking for - we'll give you the step by step instructions (and how to navigate all the key decisions) below.
Then, if you want to read on, we'll cover everything you need to know to turn the collection page you just created into an asset for your store. And if you're interested in learning how to merchandise those collections effectively - you can check out our overview of The best shopify merchandising apps. We've added some examples from the top 20 stores on Shopify so you can see visually what a great page looks like.
Creating a Collection in the Shopify UI
Step by step instructions on how to create a Collection
Alright, let's jump straight into it for those of you looking for just the raw instructions. The first thing you need to do? Log into your Shopify dashboard.
- From your Shopify admin, go to Products > Collections.

- Click Create collection.

Enter a title and description for the collection. Your collection title matters more than you think, so don't overlook this one. Jump down to how to come up with a collection title to learn more.
In the Collection type section, click Manual or Automatic. See choosing between manual and automatic below for more detail.

Click Save.
In the Products section, search for products or click Browse, and then add the products that you want to have in the collection.
Set the sort order for how you want the products to be sorted in your store. For more information about sorting, see Change the sort order for the products in a collection.
Optional: The Search engine listing preview section shows a preview of how the collection will be displayed in search results. If you want to edit this information, then click Edit website SEO. You can't change the URL and handle, because they are used to link the collection to your online store.
In the Sales channels section, click Manage to select the sales channels where you want your collection to be available.
In the Collection image section, click Add image to upload an image for the collection. For information about the sizes of images that you can use, see Image sizes.
Click Save.
Add a link to your collection in your online store navigation so that customers can find and view the collection.
Ready to try a merchandising app?
Access the techniques we've used to increase collection revenue by 10% (Free).
Get access to (1) AI collection idea generator, (2) The top 20 Shopify store menu designs, (3) 20 minute video overview of advanced collection merchandising techniques, (4) Ultimate guide to collection merchandising, (5) 1 hour merchandising consultation (1 slot per week)
Why collections are so important on Shopify
80% of your traffic visits a collection page before making their purchase decision.
Why?
Because browsing collections is the number one way users discover products on your site.
Yes, they search.
Yes, they click on emails.
But together, search and emails might account for 10-15% of your total web traffic.
And even some of those customers are going to end up on a collection page at some point during their session.
Think about every time you've ever shopped online. What's the first thing you did? Navigated to the main menu, hovered over a section of products that you're interested in, and then selected an option from the dropdown. Then you're on a collection page.
Given so much of your traffic funnels through collection pages, they are some of the most important pages on your store. Although they'r often overlooked.
Navigating the basic collection decisions
Choose a Collection Title and Writing a Description

When you're creating collections for the first time, it's tempting to rush the decision on what to name it.
No one's ever going to see the backend title for your collection, right?
Wrong.
The collection title directly impacts your url slug. So a collection titled "Womens Tees" will have the slug: womens-tees in your web address bar. These slugs are important for customer clarity - they want to make sure they're going to the right place when they click a link. But they're also important for SEO because they tell search engines what your page is about.
There are two things we typically see stores do wrong when it comes to collection titles.
First, they don't use names that have enough specificity to reflect their product assortment. For example, a dress shop might name a collection "dresses" - but every store has dresses. What's unique about the ones you sell? You don't want to be competing for traffic on "dresses" searches on google. You want to be competing for down-funnel keyworlds like 'all black party dresses'.
The second place stores tend to go wrong is creating collections of non-related products. We see a lot of stores using collections like "Hoodies and shorts". Maybe the store's buying department is internally grouped that way. But no one shops that way. Create individual collections for individual product categories. It'll make it way easier to manage your store going forward.
Should you use a Manual vs Automatic Collection
Every time you create a collection in Shopify - you'll need to decide whether you want that collection to be Manual - meaning you put all the products in the collection - or Automatic - meaning Shopify will select products to put into the collection based on rules that you define.
Here's the deal.
Automatic sounds amazing.
But for most stores, its a trap. Why?
Because, to do Automatic collections well, you need to have a high-quality, consistent tagging structure throughout your product catalog.
And you need to be following that tagging structure now AND in the future.
Otherwise, here's what happens. Say you create a collection that contains all of your seasonal sweaters for fall and winter. This year, you decide to tag all those products with "seasonal-sweaters" so you set the Automatic collection to include all products with the tag "seasonal-sweaters". Everything's going great so far!
But next year, you forget that the collection uses that specific tag as the product include criteria. Now you decide to tag all your sweaters "fall-sweaters". Guess what happens? The collection no longer pulls in any of your products. And you won't know that until you click on the collection and see that it's blank!
So we recommend almost all stores go manual.
It's a pain at first. But it forces you to make sure your products are getting added to the right collections.
And since collection pages are the only way for your products to actually get shown to customers, it's time well spent.
Adding Collection Images
For most brands, we actually advise to not use collection images.
Here's why. Most customers are coming to collection pages to see products, and collection images generally get displayed at the top of the collection page.
As a result, the actual product images get pushed down the page. You only have so much screen space "above the fold" (i.e. the first time a user has to scroll), and we think that space is better used for the products themselves rather than an image that tries to capture the feel of the collection. Not using images also has the added bonus of reducing your need for additional photography and graphic design every time you want to launch a new colleciton.
Adding your collections to your top navigation

After you've created a collection - do not forget to add that collection to your navigation! Otherwise your customers won't be able to see that it's available.
It seems like an obvious thing to do, but we've forgotten to dozens of times while building our own stores.
The reason for that?
You can't actually add a collection link to your navigation menus from the collection page itself.
To add the collection link to your navigation, you need to:
From your Shopify admin, go to Products > Collections.
Click on the Menu title you want to edit
Click "Add Menu Item"
Search for or paste your collection link into the dialog box that opens
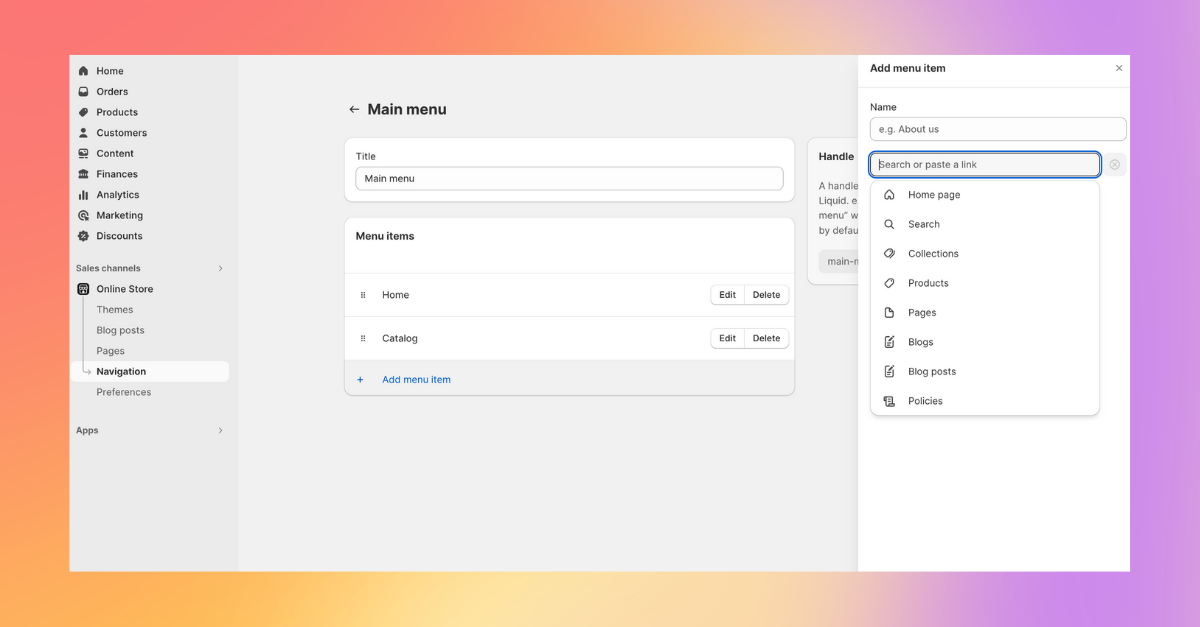
Drag your link into the desired position
Hit Save
It's a little cumbersome at first, but you'll get used to the flow.
Adding products to your collection page
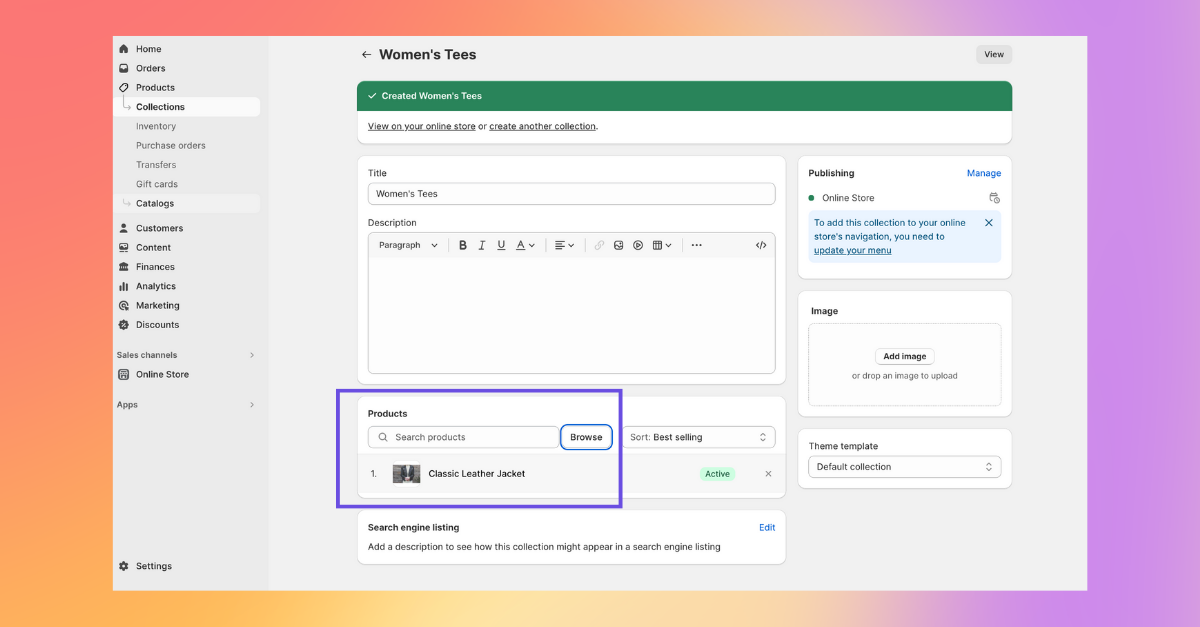
Alright, so now we have our collection set up, we know how to add it to the main menu - here come's the (sometimes) hard part: actually adding products to the collection page.
The reason we say sometimes?
Because sometimes its really easy to decide which products go into a collection. If you have a "Shorts" collection, your shorts are going to go in it.
But other times it's not as clear.
What exactly qualifies as an "Accessory" - a wallet? a bag? shoes? only some shoes?
You get the idea.
The important thing you're trying to do when you're adding products to a collection is to create an assortment that's deep enough and interesting enough to grab your customer's attention.
There are two primary ways you can do that.
The first is by adding enough product depth to make the collection scrollable. In general, we advise our clients to make sure that every collection they create has at least 24 products. Why 24? That's the number of products that typically fills an entire page.
And having at least 24 products allows you to do the other important thing: allow your customers to browse a variety of price points. If you have less than 10 products in a collection it's hard to meet customer expecations for different price / value combinations. But by the time you get to 48 or 100 products, you're able to hit a number of different sweet spots.
Once you know which products you want to add, actually putting them into the collection in Shopify is easy.
Head over to the collection you just created
Find the "Products" section midway down the page
Type the name of the products you want to add into the "Search" bar
Select it in the dialog box that appears
Select "Add"
And you're good to go!
How to add a filter to a collection page

Good news! Adding search and filter to your collections is now FREE on Shopify. For those of you who are new to the world of Shopify, this wasn't the case in the past.
Shopify released it's own version of search and filters in July 2022, and it's become the best option for most stores getting started with filters.
Filters let your customers quickly navigate through large product assortments, so if you have any collections with more than 50 products, they are a must have.
If you needed any further convincing: 95% of the top 20 stores on Shopify use filters.
If you want to install the app on your store, you can head over to the Shopify App Store Listing
Collection page design and inspiration
Whenever we're starting something new for the first time, reading how to article can be helpful, but ultimately, its best to learn from what the leading brands are doing. After all, they have years and years of experience building and designing the best store possible. We might as well learn from the lessons that they probably had to learn the hard way.
That's why, over the last few months, we've been researching what all of the top Shopify stores are doing on their collection pages.
We're going to publish the full article shortly.
But, in the meantime, here are the high-level trend and insights we're seeing that help these stores create high converting, on brand collection pages.
Great collection pages have great product imagery

The number one thing that will stand out to you when you land on the best performing collection pages?
The product photography is top notch.
If you're just getting started with collection pages, upgrading your product photography is the first thing to do. In addition to improving your collection page appeal, it'll also upgrade your product detail page experience at the same time.
The other optimizations we're going to mention below are secondary in importance.
And look, yes, we used an image from PSD above. They have some of the best photography of any Shopify store on the planet.
But your photography doesn't need to be as lavish. Start with shooting your products as flats (i.e. using non model shots) on a neutral background (gray looks premium) with good lighting. It'll punch up your store in no time.
Push out of stock products to the end of your collection
We've said it before, and we'll say it again: your customers can't buy products that are out of stock.
Showing out of stock products at the top of a collection is an all-too-common theme on Shopify.
And we get it. It's hard to stay on top of constantly changing inventory.
But the best collection pages make sure their out of stock products are pushed down to the end of the collection. A lot of the time we think of collection pages as analgous to google search results - image how annoying it would be if Google showed you links that you couldn't click on. That's what you're doing to your customers when you show them out of stock products.
The only problem?
You can't push down out of stock products natively in Shopify.
You'll have to use an app for this task. There are a variety of them out there (including ours). check out The best merchandising apps on Shopify
The best layouts for collection pages
Once you've reviewed enough collection pages, you'll get a sense for the optimal layout.
And, based on our review, here's what the top brands are doing:
They put their faceted navigation on the LEFT of the screen rather than at the top. This way the fitlering options stay with the user as they scroll down the page. And the left-hand placement also allows the full navigation options to be show right away rather than being stuck behind drop down menus.

They show related searches and products ate the bottom of the page. A lot of the time users get lost when they reach the bottom of the collection. The only thing they have to click on is a set of links in the footer. The best brands use this space differently. They incorporate related product searchers and recommended products so users keep browsing rather than bouncing.
They use grid rather than list view for their products. Every now and then we still come across brands using a list view (that's one product per row) for their product catalog. Almost everyone has migrated to grid-based views. And that's a good thing. Grids help your customer locate themselves on the page. If they saw something that they liked, its easy for them to navigate back to it. Most stores use rows of 3 or 4 products. And 2 product wide rows are common on mobile.
They use pagination rather than infinite scroll. This is a spicier take. You know how we just talked about users being able to locate themselves within a collection is important? Well we think most brands should be using pagination rather than infinte scroll for this exact reason. It's much easier for a customer to remember "I saw a product on page 1 that I liked" than it is for them to try to locate that same product when the page keeps loading more and more products. You'd think that not having to load another page would keep people browsing longer, but studies show the impact to conversion isn't worth it.